Kree’arra Best in Slot Gear & Strategy Guide

Kree’arra Strategy Guide

AKA - Armadyl Requirements - 70 Range

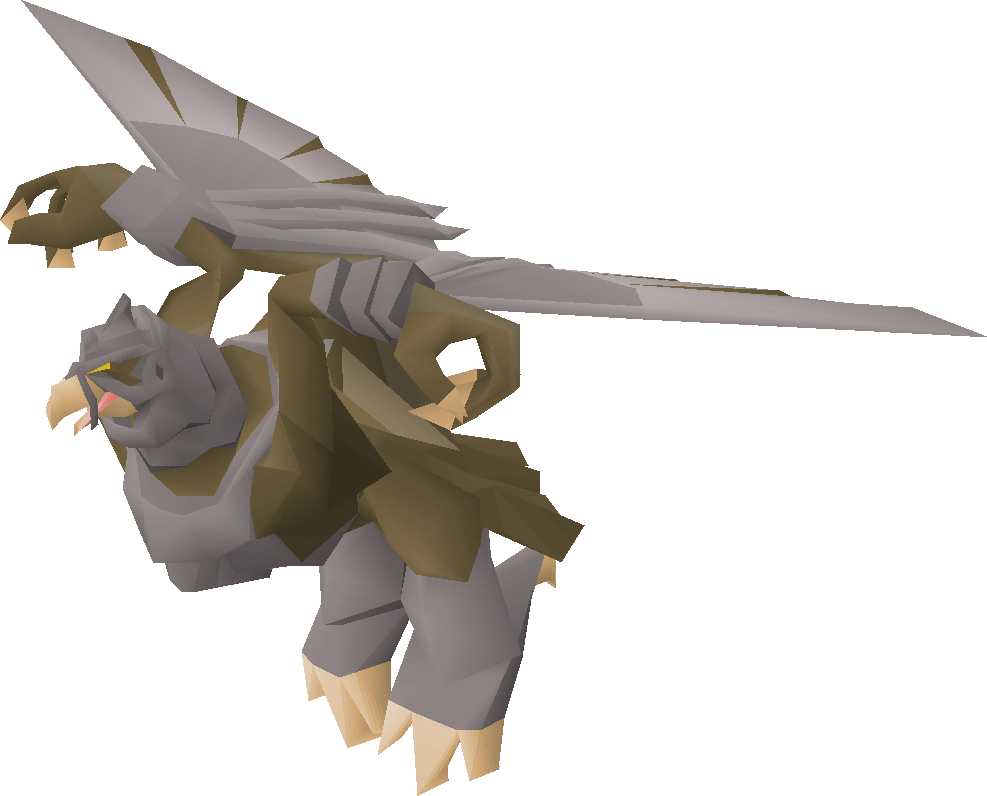
Kree’arra is a powerful Aviantese boss in the God Wars Dungeon. Her primary attack is ranged although also uses a magic attack. Kree’s attacks will hit every player in the room at the same time, meaning you cannot enter this fight with a designated tank like the other God Wars Dungeon bosses.

Kree can stack up to 71 damage at once so it’s vital that the player keep the protect from missiles prayer active at all times. Kree’s other unique attack will push the player back in a gust of wind, this pushback can be avoided by placing yourself in the corner of the room.

As Kree’arra is classed as an Aviansie, a slayer task of Aviansies will allow you to use a black mask or slayer helmet, which greatly increases your DPS and the number of kills you will be able to achieve in a single trip.

The most common tactic to use at Kree’arra is to use black chinchompas and focus your attacks on one of the minions in the room – as the minion has a much lower defence that Kree, the AoE damage from the chinchompa will deal more damage to Kree than if you were to attack her directly.

Ecumenical keys – Due to the difficulty in getting the 40 kill count required to enter the Armadyl boss room – it’s highly recommended to obtain an ecumenical key instead. The ecumenical key will allow you to bypass the kill count requirement and can be obtained much quicker from the Wilderness God Wars Dungeon before you make your trip to Armadyl.

God Wards Dungeon Notes – You will need to bring one rope to gain access to the dungeon for the first time and access to Armadyl’s Eyrie in the dungeon requires you to have 70 ranged and a mithril grapple. When entering the dungeon, you will take damage from a variety of different monsters if you are not properly prepared.  There are certain god-aligned items you can equip in order to give yourself protection from that specific god’s followers. For example, equipping a Bandos Godsword while in the dungeon will make all minions in the dungeon which are aligned with Bandos non-aggressive.

The protection needed in order to have full protection in Armadyl’s corner of the dungeon is  Bandos, Zamorak and Saradomin and Armadyl. However, in Armadyl’s Eyrie you will only need an Armadyl item and a Zamorak item to get your kill count and enter the Armadyl boss room comfortably.

Notable Drops
Armadyl Helmet - OSRS item icon
Armadyl Chestplate - OSRS item icon
Armadyl Chainskirt - OSRS item icon
Armadyl Hilt - OSRS item icon

Armadyl - Ranged Chinchompas Guide

The ranged chinchimpa role at Armadyl is fairly simple. When you enter the room, use the protect from missiles prayer and head straight to any corner in the room. While using chinchompas, you need to target the minions in the room and make sure the AoE damage is also hitting Kree’arra. When one minion dies, you need to run along the walls to re-align the next minion and continue throwing your chinchompas.

Armadyl Video Guide

Recommended Setup

Setup Bonuses

Equipment bonuses for this recommended setup.

Attack bonus

Stab: 0 Slash: 0 Crush: 0 Magic: 0 Ranged: 0

Defence bonus

Stab: 0 Slash: 0 Crush: 0 Magic: 0 Ranged: 0

Other bonuses

Melee strength: 0 Ranged strength: 0 Magic damage: 0 Prayer: 0

Inventory

View your recomended inventory below.

Toxic blowpipe (empty) - OSRS item icon
Bastion potion(4) - OSRS item icon
Saradomin brew(4) - OSRS item icon
Super restore(4) - OSRS item icon
Bronze crossbow - OSRS item icon
Mith grapple (unf) - OSRS item icon
Rune pouch - OSRS item icon
Bones to peaches (tablet) - OSRS item icon
Teleport to house (tablet) - OSRS item icon

Armadyl - Ranged Tank Guide

The ranged tank role at Armadyl is simple but less effective than the ranged chinchompa role. When you enter the room, use the protect from missiles prayer and head straight to any corner in the room. Using your crossbow, you need to target and continue hitting Kree’arra until she dies.

Armadyl Video Guide

Recommended Setup

Setup Bonuses

Equipment bonuses for this recommended setup.

Attack bonus

Stab: 0 Slash: 0 Crush: 0 Magic: 0 Ranged: 0

Defence bonus

Stab: 0 Slash: 0 Crush: 0 Magic: 0 Ranged: 0

Other bonuses

Melee strength: 0 Ranged strength: 0 Magic damage: 0 Prayer: 0

Inventory

View your recomended inventory below.

Toxic blowpipe (empty) - OSRS item icon
Bastion potion(4) - OSRS item icon
Saradomin brew(4) - OSRS item icon
Super restore(4) - OSRS item icon
Bronze crossbow - OSRS item icon
Mith grapple (unf) - OSRS item icon
Rune pouch - OSRS item icon
Bones to peaches (tablet) - OSRS item icon
Teleport to house (tablet) - OSRS item icon

Rune Pouch

Your Rune Pouch should contain:

Astral Rune
Death Rune
Earth Rune

Kree'arra Guide

Kree'arra is the Armadyl-aligned general of the God Wars Dungeon, the most powerful of the surviving aviansie and leader of the forces in Armadyl's Eyrie. He is a combat level 580 boss with 255 Hitpoints who roams a rectangular chamber with three bodyguards until a player enters, at which point the whole group attacks on sight. He is the ranged-meta GWD general: because he is airborne, regular melee attacks simply do not reach him, so this is a Ranged or Magic fight.

Kree'arra primarily attacks with Ranged, and his bodyguards each use a different combat style. His ranged tornado can hit up to 69 and strikes everyone in the room, which is why Protect from Missiles must stay on the entire time he is alive. This guide covers the killcount and boss-room entry, the requirements to reach him, the meta gear style, your supplies, every attack and bodyguard, the kill rotation, and his notable drops. To plan an exact loadout for your stats, use our Boss Gear Finder above.

Requirements & where to fight

Kree'arra is fought in the Armadyl boss room inside the God Wars Dungeon. To reach the dungeon area itself you typically need Death Plateau and Troll Stronghold to the point where you defeat Dad; alternatively, Ghommal's hilt can teleport you to Trollheim without either quest.

To navigate into Armadyl's encampment you must wield any crossbow together with a mithril grapple, and you need a Ranged level of at least 70 to cross the chasm. To enter the boss room itself, you must either use an ecumenical key or have killed 40 followers of Armadyl in the dungeon (aviansie and their spiritual variants are his only followers). Players who have unlocked the relevant Combat Achievement tiers need fewer kills — 35 for hard, 30 for elite, 25 for master, and 15 for grandmaster.

Because Armadylean killcount is slow and requires praying through aviansie, many players prefer bringing an ecumenical key to skip it entirely. This matters even more on a Slayer task of aviansie: killing aviansie for killcount would progress the task, reducing how many Kree'arra you can kill on-task.

Recommended stats & gear

The Wiki's suggested skills are 85+ Combat (100+ recommended), 70+ Ranged (80+ recommended), 70+ Defence (80+ recommended), 70+ Hitpoints (80+ recommended), 44+ Prayer for Eagle Eye, and 92 Magic if you intend to use Blood Barrage to heal off the bodyguards.

Gear philosophy, not a shopping list. Because Kree'arra is airborne, regular melee will not hit him — only halberds and salamanders can reach him at all, and even those are not generally recommended given his extremely high melee Defence. The practical styles are therefore:

  • Ranged — the standard approach. A strong bow or crossbow on rapid, with high-tier ranged armour; see our ranged gear guide for families by tier.
  • Magic — Tumeken's shadow is the strongest weapon for conventional methods and far cheaper and more efficient than throwing chinchompas, but this needs near-max magic gear to be worth it.
  • Chinchompas — because his defensive stats are exceptionally high, throwing red or black chinchompas to deal indirect AoE damage (by targeting the melee bodyguard) is one of the most effective methods, especially without access to a top-tier weapon.

Note that Kree'arra has a 30% elemental weakness to wind (Air) spells. Rather than listing exact best-in-slot items, plug your levels into the Boss Gear Finder above for a loadout tailored to your stats and style.

Inventory & supplies

Kree'arra trips are sustained by brews, restores, and high-healing food, plus the ability to heal off the bodyguards. A typical setup brings:

  • Your best ranged weapon (or Tumeken's shadow / chinchompas, depending on method), plus a toxic blowpipe for cleaning up the minions and specs.
  • An ecumenical key to open the room, and any crossbow with a mithril grapple to reach the lair if you are not already using a crossbow.
  • Saradomin brews and super restores — exact counts vary by method, with ranged-tank setups carrying many brews and a smaller number of restores.
  • A rune pouch with the runes to cast Blood Barrage (to heal off the minions) and ice spells to freeze Flight Kilisa.
  • Ranging or bastion potions to boost your accuracy and damage.
  • A one-click teleport (such as a Teleport to house tablet), and any necessary god items for safely crossing the dungeon. High-healing food such as anglerfish or manta rays fills the remaining space.

Kree'arra and his bodyguards drop bones that can be turned into peaches with bones to peaches tablets — peaches heal 8 each, so you can recover about 32 Hitpoints per encounter. The bodyguards also occasionally drop manta rays or mushroom potatoes, which should be juggled if your inventory is full.

Fight mechanics

Kree'arra, unlike the other generals, uses all three forms of combat. He has an attack speed of 3 and by default attacks with Ranged and Magic, both of which hit every player in the room and can knock you back a tile unless you stand in the corners of the chamber.

  • Ranged tornado (up to 69): his main attack, a grey dust tornado. This is by far his biggest hit, so Protect from Missiles must be kept on at all times while Kree'arra is alive — without it you will likely die quickly.
  • Magic tornado (up to 21): a blue dust tornado. Despite being a magic attack, it is classified as ranged magic — its accuracy rolls against your ranged Defence bonuses, not your magic Defence, so high ranged Defence helps against it too.
  • Talon swipe (up to 26): if Kree'arra is not being targeted, he will fly up to his target and swipe with his talons. Keep attacking him to avoid this.

His three bodyguards each use a different style: Flight Kilisa (melee, up to 15), Wingman Skree (magic, up to 16), and Flockleader Geerin (ranged, up to 25). In practice only Kilisa is a real threat — Skree is generally inaccurate, and Protect from Missiles already blocks Geerin's attacks.

Strategy & common mistakes

Core loop: keep Protect from Missiles active the entire time Kree'arra is alive, and keep attacking him so he never reverts to his talon swipe. Stand under Kree'arra after each attack to reduce how often he can attack you — his 3-tick cycle is faster than most weapons, so walking under him after every shot cuts the damage you take. On rapid a crossbow and a twisted bow both fire every 5 ticks, while a bow of Faerdhinen fires every 4 ticks.

Chinchompa method: stand in the south-western corner, lure both Kree'arra and Flight Kilisa together, and throw chinchompas at Kilisa — they almost always land due to her lower Defence, and the AoE also damages Kree'arra. Crucially, you must target Kree'arra off-tick (when you are not attacking), or he will try to melee you. Kilisa will die first, so switch to a bow or crossbow to finish Kree'arra while she respawns.

After Kree'arra dies: the bodyguards remain. Kill Wingman Skree (the magic minion) with your blowpipe, and stack Kilisa and Geerin together to Blood Barrage them and heal off the damage. Bringing a staff that can autocast Ancient Magicks lets you heal larger amounts after the boss dies, conserving food for later kills. Freeze Kilisa with ice spells whenever possible to avoid her melee.

Common mistakes:

  • Dropping Protect from Missiles — his 69 ranged tornado hits everyone in the room and will kill you fast without it.
  • Trying to melee him normally — he is airborne; only halberds or salamanders reach him, and his melee Defence is extremely high.
  • Not standing under him between attacks, which lets his fast 3-tick attacks pile up.
  • Forgetting the entry requirement — arriving without an ecumenical key or 40 Armadyl killcount means slowly farming aviansie on the spot.
  • Mistreating the magic attack — it rolls against ranged Defence, so do not assume magic-defence gear protects you from it.

Notable drops

Kree'arra is fought for his Armadyl unique table, all sourced from the Wiki drop table. The marquee uniques are the Armadyl helmet, Armadyl chestplate, and Armadyl chainskirt, each at 1/381 for that specific piece (about 1/127 for any piece), plus the Armadyl hilt at 1/508. He also drops all three godsword shards at 1/762 each. The chance to get any unique is about 1/73.

Every kill always drops Big bones and feathers, and his common tables include a black d'hide body, rune crossbow, runes, ammunition, herbs, and coins. The rarest reward is the pet, Pet kree'arra, at 1/5000. The full drop table, with quantities and rarities, is shown above this guide. If you kill him on a Slayer task assigned by Konar, he can also drop a Brimstone key.

Kree Guide — FAQ

What do I need to fight Kree'arra?

You need to reach the God Wars Dungeon (typically via Death Plateau and Troll Stronghold up to defeating Dad, or Ghommal's hilt to skip the quests), a crossbow of any type plus a mithril grapple, and 70 Ranged to cross the chasm. To open his boss room you need either an ecumenical key or 40 Armadyl killcount (fewer with unlocked Combat Achievement tiers).

Why can't I melee Kree'arra?

Kree'arra is airborne, so regular melee attacks do not reach him — you must use Ranged or Magic. Only halberds and salamanders can hit him at all, and even those are not generally recommended because of his extremely high melee Defence (unless using a soulflame horn in a small team).

How much damage does Kree'arra hit, and which prayer do I use?

His ranged tornado hits up to 69 and his magic tornado up to 21, both hitting everyone in the room; his talon swipe hits up to 26 if he is left untargeted. Keep Protect from Missiles on at all times while he is alive. Note his magic attack is "ranged magic" and rolls against your ranged Defence. His three bodyguards — Flight Kilisa (melee), Wingman Skree (magic), and Flockleader Geerin (ranged) — hit up to 15, 16, and 25; only Kilisa is a real threat.

What are the best drops from Kree'arra?

His marquee uniques are the Armadyl helmet, Armadyl chestplate, and Armadyl chainskirt at 1/381 each, and the Armadyl hilt at 1/508. He also drops all three godsword shards at 1/762 each, and the pet, Pet kree'arra, at 1/5000.

Heading

More info failed :(
Possible reasons for this: our item ID is wrong, osrsbox is down or GE Tracker is down. Report this here.
OSRS item details Members Item: Tradeable:
Price: Updated: