

Hueycoatl Best in Slot Gear & Strategy Guide
Best Gear vs Hueycoatl
auto-updated from live wiki dataYour stats
Defaults to a maxed (99s) main-game account. Edit any stat to match yours.
Best Ranged setup vs Hueycoatl
Suggested items
Damage / sec
—
vs Hueycoatl
Max hit—
Accuracy—
Time to kill—
Setup value
—
Build options — pick your budget
Open in the DPS calculator →
Best in slot gear for Hueycoatl (current meta)
This setup is computed live from the same wiki-sourced combat stats and monster data that power our OSRS DPS calculator — so it tracks the current meta instead of going stale. Pick your combat style above and it ranks every viable weapon and armour piece by damage per second against Hueycoatl, factoring in the boss's defences, size and any elemental weakness.
Not at maxed stats? Lower any level on the left and the recommendation re-ranks instantly — requirement-gated gear drops out automatically. For the full ranked list per slot, open the BiS calculator; to pit two specific items against each other, use Gear Compare.
Hueycoatl Strategy Guide
The Hueycoatl Guide
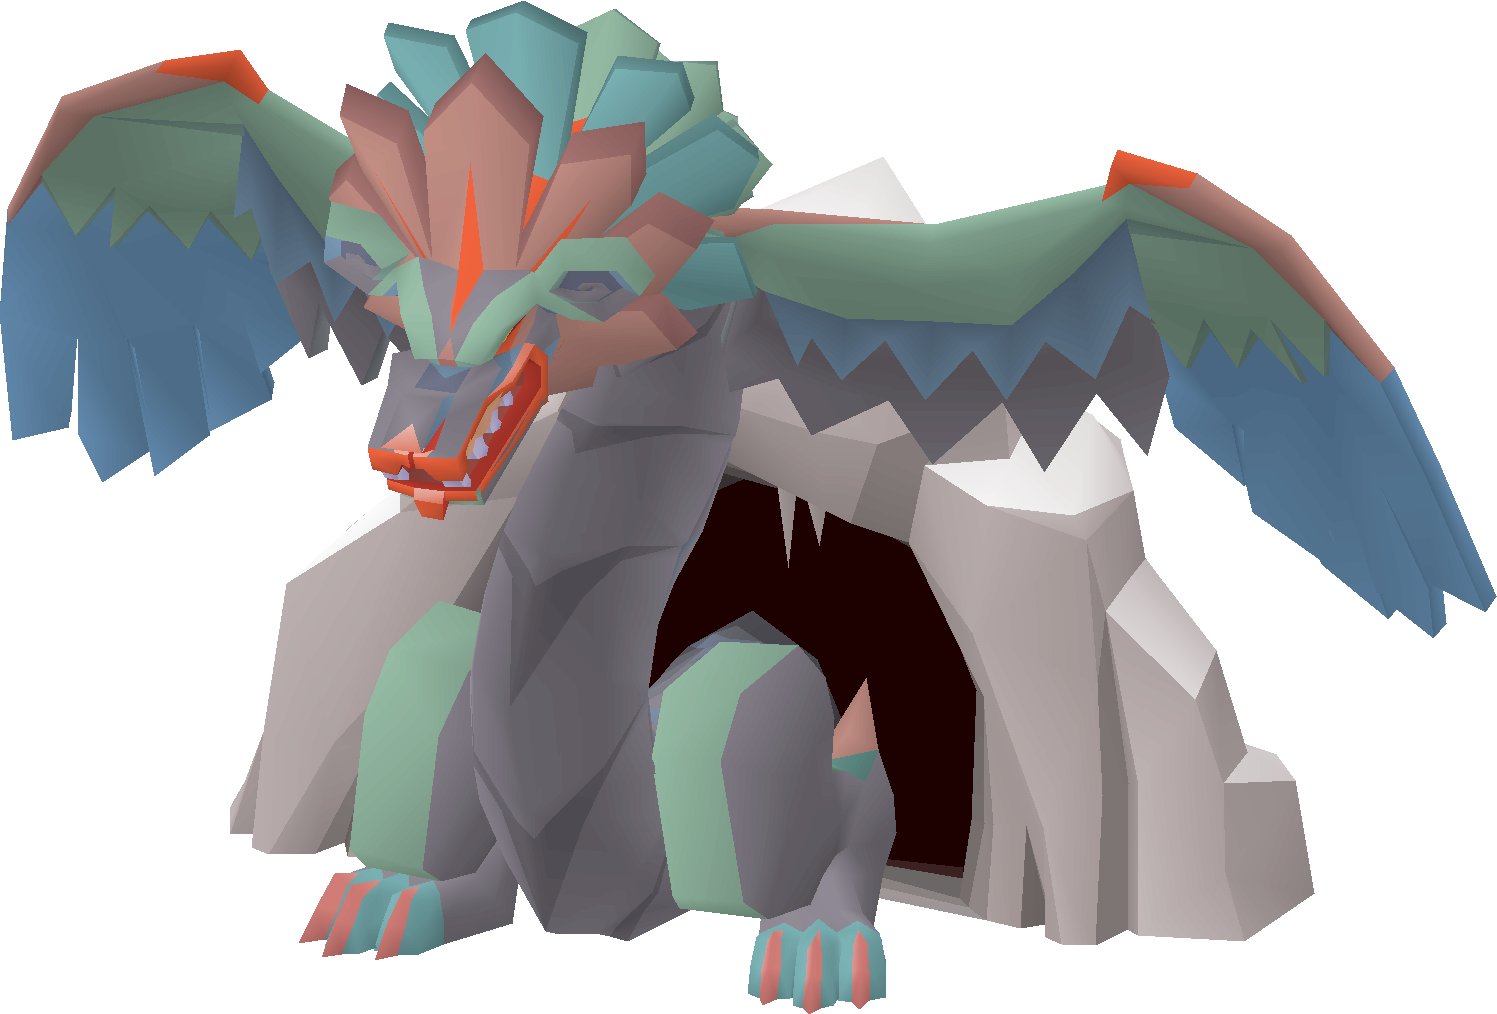
The Hueycoatl is a draconic group boss released on 25 September 2024, coiled around the Darkfrost atop the mountain in Varlamore. She is a combat level 642 monster whose head holds 2,500 Hitpoints, and she can be fought by up to 20 players at once in the public area or in a private instance. Because she is classed as a dragon, she is vulnerable to dragonbane weapons, and she is weakest to the crush attack style. Her elemental weakness is Earth (60%). This light guide covers how to get there, what to bring, and how to clear all four phases of her segmented-body and tail fight. To dial in exact gear, use our Boss Gear Finder above.
Requirements & where to fight
The Hueycoatl lives atop the Darkfrost in Varlamore. To fight her you only need to have completed Children of the Sun and spoken to Taala at the base camp. If you are below 85 combat and 43 Prayer you will get a warning when entering the arena, but you can still enter if you go through the full dialogue.
The quickest ways to reach the base camp are a pendant of ates teleport to the Darkfrost (after activating the Statue of Ates just west of the camp), or the Quetzal Transport System to Quetzacalli Gorge followed by a short run around the mountain. The Wiki's recommendations are moderate melee stats: 60 Attack, 60 Strength, 60 Defence, 70 Hitpoints, and 43 Prayer for protection prayers. A private group or solo instance costs 50,000 coins, or 25,000 if you are eligible for the hard Combat Achievement rewards. Ironmen are eligible for drops when fought in a group.
Recommended stats & gear
This is a melee boss. Because the Hueycoatl is draconic and weakest to crush, dragonbane weapons shine here, and her auto-attacks barely deal damage, so the meta leans heavily into accuracy and strength rather than defence. The Wiki notes the dragon hunter lance outperforms other crush weapons, barring a scythe of Vitur if you don't mind the upkeep, and that Inquisitor's armour is recommended for its accuracy and damage bonus (otherwise bring the best strength-boosting gear you can). Note her Defence level is 125 and defence-draining effects only drain up to 5 levels, so the Wiki advises skipping them in favour of damaging special attacks.
For the tail phase you want a weapon that hits multiple times per attack to beat the damage cap, such as the dual macuahuitl (best paired with the Blood moon armour set) or a glacial temotli. Rather than memorising a full BiS list, plug your levels into our melee gear guide or let the Boss Gear Finder build the loadout for you.
Inventory & supplies
Based on the Wiki's sample setup, bring a super combat potion (or super attack and super strength), one prayer regeneration potion, several prayer potions, and food such as sharks. Add a special-attack weapon like dragon claws or burning claws, and a multi-hitting weapon for the tail such as the dual macuahuitl. If you use the Arceuus spellbook, bring runes for resurrection spells (thralls) and a book of the dead, but note that Death Charge only works if you land the last hit on the body or head, not the tail. An imbued or saturated heart boosts Magic to extend thrall duration, and a holy wrench makes prayer potions more efficient over long grinds.
Fight mechanics
The Hueycoatl uses two attacks throughout the whole fight that you must handle no matter the phase:
- Glowing symbols spawn on the ground near players. After 4 ticks, lightning strikes anyone still standing on them for up to 16 damage, so step off them in time.
- Rain Fire launches the feathers on her back at the team. Each projectile has a colour telling you which protection prayer to use: the red melee projectile has a smoking tail end, the green ranged projectile moves with no obvious animation, and the blue magic projectile spins as it travels. Pray correctly and the hit is reduced to 0-2; pray wrong and it deals up to 14.
The fight runs across four phases. In phase one (body) you attack five exposed body segments of 250 Hitpoints each; they don't attack you, but their hitbox is only 1x1, so shift-right-click "Tag-All" or mark the object to make them easier to click. In phase two (head) the path opens and you attack her 2,500-HP head directly while the seer charges three pillars west of the head. Teams of three or more balance their protection prayers across the blue, red, and green pillars (Protect from Magic, Melee, and Missiles) to light the braziers, granting a 30% damage buff that stays up while the braziers remain lit. Solo and duo players can't balance enough prayers, so they ignore the pillars and just pray to reduce Rain Fire damage.
At 50% or less health she shields herself and becomes invulnerable, starting phase three (tail). Her tail appears with 300 Hitpoints, but attacks on it are capped at 4 damage, rising to 9 if your crush attack bonus is your highest (and all missed hits round up to 1) — which is why multi-hit weapons matter. The tail changes sides roughly every 20 seconds; each time it reappears it slams the ground and sends out a shockwave dealing 20-25 damage that you dodge by running diagonally through it. Keep your Hitpoints above 40 here to survive a shockwave landing alongside an auto-attack or lightning. Once the tail breaks, phase four (final) reopens the head; her attack speed increases and the tail keeps firing shockwaves about every 15 seconds, so you must keep moving while you finish her off.
Strategy & kill rotation
The whole encounter requires 4,050 total damage: five body segments (250 each), the head (2,500), and the tail (300). Start by entering through the chains and clearing all five body segments in phase one — entering after phase one is cleared heavily reduces your contribution. As you run up to the summit, teams typically call out in chat which prayer each player will camp so the pillars stay balanced and the 30% buff stays active; the Wiki notes the boss's own damage is inconsequential next to the extra pillar damage, so tank Rain Fire rather than risk losing the buff when the seer's charge bar is near full.
When she shields at 50%, swap to your multi-hit weapon for the tail and grind it down while dodging the shockwaves. After the tail breaks, return to the head and keep moving through phase four's faster attacks and continuing shockwaves. With best-in-slot gear a solo kill averages around 8 minutes 20 seconds (mostly the tail phase), while a well-geared trio can clear in about 5 minutes. For mechanics-heavy phases it helps to have your Prayer level up so you can flick protection prayers reliably.
Notable drops
The marquee uniques from the Hueycoatl are the tome of earth, the dragon hunter wand, Hueycoatl hide, and huasca seeds. The Wiki lists the unique drop-table roll at 1/18 per player (scaled by contribution), with the dragon hunter wand at 1/105, the tome of earth (empty) at 1/90, and Hueycoatl hide at 11/315. She also drops noted gear, runes, herb seeds, and assorted secondaries, plus the tooth half of key (moon key) and the Huberte pet as tertiaries. The full drop table is shown above.
Common mistakes
- Standing on the glowing symbols too long — the lightning hits for up to 16 after 4 ticks; step off in time.
- Skipping phase one — failing to deal at least 25 damage to the body reduces your rewards by 95% and lowers your pet chance by the same amount.
- Bringing the wrong weapon to the tail — single-hit weapons crawl against the damage cap; swap to a multi-hit weapon like the dual macuahuitl.
- Letting your Hitpoints drop below 40 in the tail phase — a shockwave plus an auto-attack or lightning at once can kill you.
- Bringing defence-drain specs — her Defence only drains up to 5 levels, so the Wiki recommends prioritising damaging special attacks instead.
Hueycoatl Guide — FAQ
What do I need to fight the Hueycoatl?
You only need to have completed Children of the Sun and spoken to Taala at the Darkfrost base camp. The Wiki recommends moderate melee stats (60 Attack, Strength and Defence, 70 Hitpoints, 43 Prayer). Below 85 combat or 43 Prayer you get a warning, but you can still enter through the full dialogue.
What combat style and gear work best?
It's a melee boss that is draconic and weakest to crush, so dragonbane weapons like the dragon hunter lance excel, with Inquisitor's armour recommended for accuracy and damage. For the tail phase use a multi-hitting weapon such as the dual macuahuitl. Use our Boss Gear Finder above for the exact loadout.
How do the prayer pillars and damage buff work?
In the head phase the seer charges three pillars. Teams balance their protection prayers across Protect from Magic (blue), Melee (red), and Missiles (green) to light the braziers, granting a 30% damage buff that lasts while the braziers stay lit. Solo and duo players can't balance enough prayers, so they ignore the pillars and just pray against Rain Fire.
What are the main drops?
The notable uniques are the tome of earth, the dragon hunter wand, Hueycoatl hide, and huasca seeds. There is a 1/18 chance per player to roll the unique table (scaled by contribution); the dragon hunter wand is 1/105 and the tome of earth (empty) is 1/90.
Heading
Possible reasons for this: our item ID is wrong, osrsbox is down or GE Tracker is down. Report this here.

