

Phosani’s Nightmare Best in Slot Gear & Strategy Guide
Best Gear vs Phosani’s Nightmare
auto-updated from live wiki dataYour stats
Defaults to a maxed (99s) main-game account. Edit any stat to match yours.
Best Ranged setup vs Phosani’s Nightmare
Suggested items
Damage / sec
—
vs Phosani’s Nightmare
Max hit—
Accuracy—
Time to kill—
Setup value
—
Build options — pick your budget
Open in the DPS calculator →
Best in slot gear for Phosani’s Nightmare (current meta)
This setup is computed live from the same wiki-sourced combat stats and monster data that power our OSRS DPS calculator — so it tracks the current meta instead of going stale. Pick your combat style above and it ranks every viable weapon and armour piece by damage per second against Phosani’s Nightmare, factoring in the boss's defences, size and any elemental weakness.
Not at maxed stats? Lower any level on the left and the recommendation re-ranks instantly — requirement-gated gear drops out automatically. For the full ranked list per slot, open the BiS calculator; to pit two specific items against each other, use Gear Compare.
Phosani’s Nightmare Strategy Guide
Phosani's Nightmare Guide
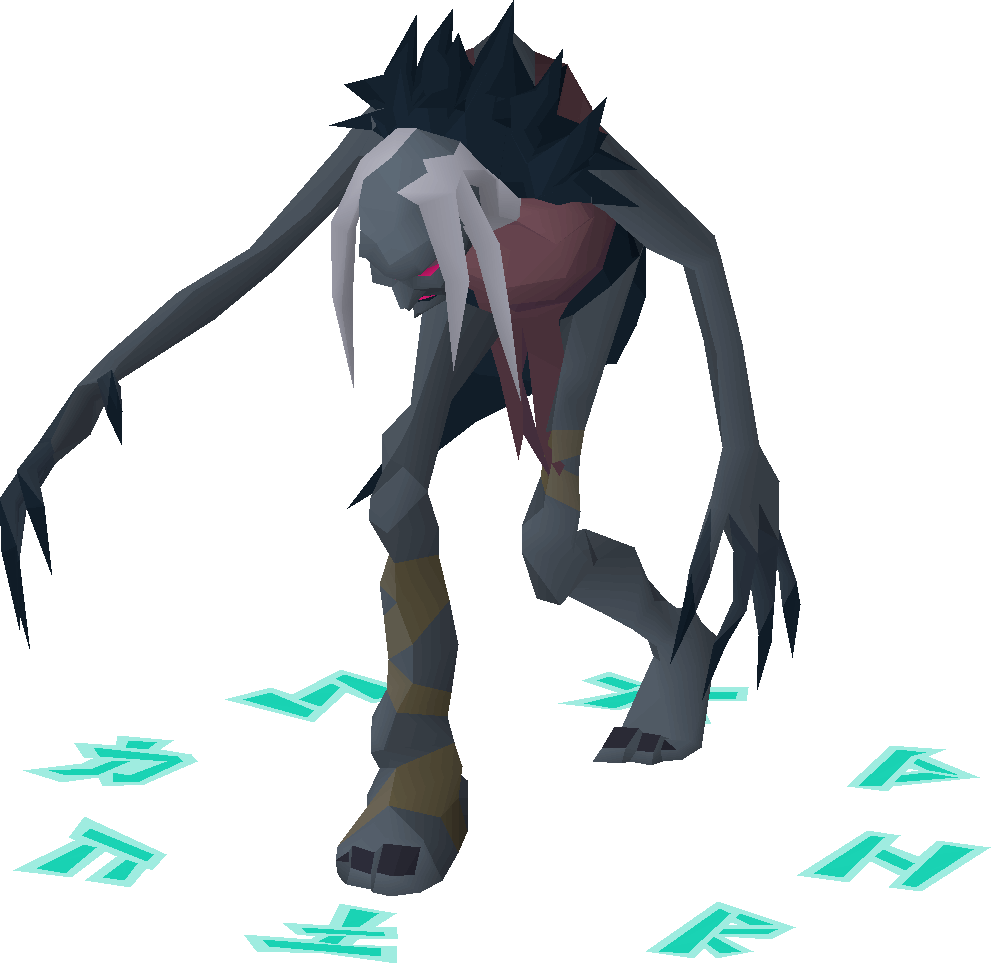
Phosani's Nightmare is the harder, solo-only version of The Nightmare, fought by selecting Drink-from on the Pool of Nightmares in the Sisterhood Sanctuary, a dungeon beneath Slepe in Morytania. She is combat level 1,024 with 3,200 hitpoints, and unlike the group Nightmare she can only be fought alone in an instance, so there is no need to hop worlds.
Compared with the regular Nightmare solo, Phosani's is significantly faster but far more punishing: her standard attacks hit much harder, yet praying correctly fully blocks them. An ideal kill sees only minor chip damage, but a couple of mistakes can quickly end a trip. She also carries two unique drops the original lacks — the Slepey tablet (a faster teleport to her) and the parasitic egg (a cosmetic skin for the little nightmare pet). This guide covers her requirements, the gear style that works, her attacks and how to pray against them, and the mistakes that get players killed.
Requirements & where to fight
Phosani's Nightmare lives in the Sisterhood Sanctuary beneath Slepe, in Morytania. The only hard requirement is completion of the quest Priest in Peril, which unlocks access to Morytania. You do not need a prior Nightmare kill — the game encourages at least one and shows a warning if you have none, but since August 2022 Sister Senga lets you fight Phosani's without first defeating The Nightmare; you can ignore the warning and proceed.
The Wiki recommends (these are advised, not mandatory) high combat stats: around Attack 95+, Strength 95+, Defence 85+, Magic 95+, Hitpoints 95+ and Prayer 70+. Completing A Taste of Hope for the Drakan's medallion gives the quickest teleport to Slepe; the ectophial from Ghosts Ahoy is the second fastest. If you die during the fight you respawn at the Pool of Nightmares, and Sister Senga acts as an item-retrieval service for a flat 60,000 coins regardless of what you lost.
Recommended stats, gear & supplies
This is a melee-primary boss with a magic component: the shield phases are killed with melee, while her totems take charge damage and are best whittled down with magic. The Wiki advises prioritising melee upgrades over magic, since the fight emphasises melee combat. Phosani's Nightmare is not undead, so a Salve amulet has no effect on her.
For the melee setup, the meta favours a high-strength offensive loadout with a crush-style weapon — she is weakest to crush, with a crush defence of just 40 versus 120 to stab and 180 to slash, and crush always lands a guaranteed maximum hit on husks and weakened parasites, which is central to the fight. For the totem phase, a powered staff with as many magic-damage switches as possible is used; because totems have no defensive stats, magic accuracy is worthless — only items that raise your max hit are worth bringing. Rather than list exact best-in-slot items, use our Boss Gear Finder above to build the loadout for your bank, and see our melee gear guide for the broader progression.
For supplies, the Wiki recommends food that heals around 22 (anglerfish are ideal for overhealing) for chip damage and mistakes, prayer potions, and a Sanfew serum — sipping a dose before a parasite bursts weakens it and greatly cuts the damage. Bring a stamina potion if you have not unlocked the Drakan's medallion teleport, as your run energy will run out before you even reach the sanctuary. A long-ranged, fast weapon (such as a toxic blowpipe or webweaver bow on rapid) is recommended for killing sleepwalkers. An amulet of blood fury is useful for learners but is not mandatory.
Fight mechanics
Phosani's Nightmare shares the same combat stats as the original despite her higher combat level. The fight is split into shield phases plus a final low-HP phase and a desperation phase, with totems to charge down using magic. Note: the Wiki's body text describes "four phases", but the same page's changes log (25 June 2025) states "the first phase of the encounter has been removed" — so treat the exact phase count as having changed and focus on the distinct attacks below rather than a fixed number.
Standard attacks (pray to fully block):
- Ranged — she contorts and fires projectiles; you have 3 ticks to react with Protect from Missiles. Max hit 80.
- Magic — she surrounds herself with pink petals then spins and flings them; 3 ticks to react with Protect from Magic. Max hit 80.
- Melee — she charges her claws and scrapes the area in front of her; only 2 ticks to react with Protect from Melee. Max hit 73. This always hits if unprotected regardless of your defence, but can also be dodged by stepping one tile away as the claws rise.
Special attacks:
- Grasping Claws — she spawns black portals around you; standing on any portal deals roughly 50–65 damage. Step to a tile with no portal to avoid it. Used randomly, throughout Corpse Flowers and Spores, and continuously in the final phase.
- Husks — two husks spawn and freeze you in place until killed; the blue skinny husk uses magic, the green bulky one uses ranged. A crush weapon always max-hits them.
- Parasites — she impregnates you with a parasite that bursts after about 18 ticks for heavy damage, then heals her until killed. Drink a Sanfew serum (or Relicym's balm) before it emerges to weaken it and slash the burst damage; a crush weapon then guarantees a max hit on the weakened parasite.
- Spores — puffshroom objects spawn; coming within 1 tile makes one explode, making you weary (run disabled, attack speed slowed by 2 ticks, and every yawn drains 6 prayer). Paired with Grasping Claws.
- Corpse Flowers — the room splits into four quadrants; the safe one shows white nightmare flowers and the rest show red berries. Standing in the wrong quadrant deals rapid damage that heals her for double, and your attacks heal her instead. Paired with Grasping Claws.
- Curse — a pink glow shuffles your protection prayers to the right (Protect from Melee triggers Magic, Magic triggers Missiles, Missiles triggers Melee) for 5 attacks.
- Surge — she teleports to one edge and surges across to the opposite side for up to ~80 damage; move out of her path.
Sleepwalkers & desperation: at the end of the early phases she summons sleepwalkers (scaling up to four) that walk toward her while she charges a power blast. Sleepwalkers have 10 HP and you always max-hit them; the more that reach her, the stronger the blast, and if none are killed the blast always kills you. Kill them with a fast long-ranged weapon. In the final desperation phase she indefinitely uses Grasping Claws and spawns sleepwalkers one at a time; these only deal 15 damage on reaching her, so focus on ending the fight rather than the sleepwalkers.
Strategy & kill rotation
Before heading in, eat an anglerfish to overheal. The fight plays out like the original but much faster and far less forgiving — her auto-attacks can kill in two hits. The core skill is prayer-switching: correctly prayed standard attacks deal zero damage, so an ideal kill is mostly clean. In phase 3 she deactivates your protection prayer as her attack animation starts and uses melee more often, so prioritise re-activating Protect from Melee (or Ranged if Curse is active). Without a Saradomin godsword to cover mistakes, the Wiki notes you generally get about three mistakes before a fourth likely kills you.
Handle the specials methodically: pray against standard hits, dodge Grasping Claws by stepping to a free tile, weaken every parasite with a Sanfew serum dose before it bursts, and stay in the white-flower quadrant during Corpse Flowers. An advanced movement technique called corner rifting — standing under the boss at the corners of her collision box and stepping out before the next rifts form — lets skilled players keep attacking while dodging. For the totems, use a powered staff (and a ghostly thrall, which deals doubled damage to totems, focusing one totem at a time). Enter the final phase with full HP, boosted melee stats and full special-attack energy, then dump specials to end it quickly — a strong spec weapon can clear it in a few hits.
Notable drops
SSOT note: drops below are taken only from the fetched Wiki page. Phosani's Nightmare has a lower unique rate than the original but faster kills and larger common drops. Her marquee uniques are the Inquisitor's armour set (each armour piece — great helm, hauberk and plateskirt — at 1/700), the Inquisitor's mace, and the Nightmare staff plus the three orbs (Eldritch, Harmonised and Volatile, each 1/1600) that upgrade it. Two uniques are exclusive to Phosani's version: the Slepey tablet (1/25, and guaranteed on the 25th kill) which unlocks a faster teleport, and the parasitic egg (1/200) which unlocks a cosmetic little-nightmare skin. The pet, Little nightmare, drops at 1/1400 and the Jar of dreams at 1/4000. The full drop table is shown above; check live values with our GE price tracker.
Common mistakes
- Reacting late to standard attacks. Melee gives you only 2 ticks — a single tick late on the claw scrape lands a hit that can two-shot you.
- Not weakening parasites. Skipping the Sanfew serum dose means the burst hits hard and the parasite's burst damage is added to its health, so even a crush weapon will not max-hit it.
- Ignoring sleepwalkers. Letting them reach her makes the power blast stronger; if none are killed the blast always kills you.
- Forgetting the Curse shuffle. While cursed your prayers are shifted one to the right for 5 attacks — clicking the obvious prayer activates the wrong one.
- Standing in the wrong Corpse Flower quadrant. You take rapid damage that heals her double, and your own hits heal her.
- No stamina potion without the teleport unlock. Run energy depletes before you reach the sanctuary if you have not unlocked the Drakan's medallion teleport.
Phosani's Nightmare Guide — FAQ
What do I need to fight Phosani's Nightmare?
The only hard requirement is completing the quest Priest in Peril for Morytania access. High combat stats are recommended (roughly 95 Attack/Strength/Magic/Hitpoints, 85 Defence, 70 Prayer) but not required. You do not need a prior Nightmare kill.
Is Phosani's Nightmare solo only?
Yes. Unlike the regular Nightmare, Phosani's can only be fought alone, in an instance, so there is no need to world-hop.
How do I deal with parasites?
Drink a dose of Sanfew serum (or Relicym's balm) before the parasite bursts to weaken it — this greatly reduces the burst damage and lets a crush weapon land a guaranteed maximum hit to kill it. If you do not weaken it, its burst damage is added to its health and it heals the boss until killed.
What gear should I bring?
A melee-primary loadout with a crush-style weapon (crush guarantees max hits on husks and weakened parasites), plus a magic-damage powered-staff setup for the totem phase. Prioritise melee upgrades over magic. Build the exact loadout for your bank with our Boss Gear Finder.
Heading
Possible reasons for this: our item ID is wrong, osrsbox is down or GE Tracker is down. Report this here.

