Alchemical Hydra Best in Slot Gear & Strategy Guide

Alchemical Hydra Strategy Guide

AKA - Hydra Requirements - 95 Slayer

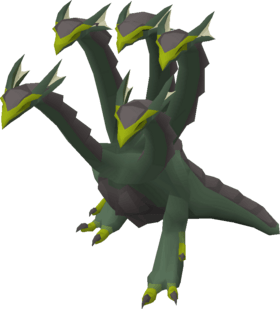
The Alchemical Hydra is a Hydra Boss found within the Karuulm Slayer Dungeon on the Great Kourend.

The Alchemical Hydra can only be fought while on a Slayer task for Hydras or a boss task for Alchemical Hydras and has a slayer level requirement of 95.

The Alchemical Hydra is currently extremely popular, as it has only just been released the price of the unique drops has not yet settled. The [osrsbox name=”Hydra Leather” id=”22983″], [osrsbox name=”Hydra Tail” id=”22988″], and the [osrsbox name=”Hydra Claw” id=”22966″] can all be crafted into the [osrsbox name=”Ferocious Gloves” id=”22981″ type=”bonuses”], the [osrsbox name=”Bonecrusher Necklace” id=”22986″ type=”bonuses”] and the [osrsbox name=”Dragon Hunter Lance” id=”22978″ type=”bonuses”] respectively.

The Hydra also has three non-tradeable unique drops, the Hydra’s Eye, Hydra’s Fang, and the Hydra’s Heart. These three items are combined to make the [osrsbox name=”Brimstone Ring” id=”22975″ type=”bonuses”], the new best in slot tribrid ring.

The most effective tactic to use at the Alchemical Hydra seems to be to use Ranged, with either a [osrsbox name=”Toxic Blowpipe” id=”12926″ type=”bonuses”] or a [osrsbox name=”Twisted Bow” id=”20997″ type=”bonuses”].


Hydra - Ranged Guide

The Alchemical Hydra has three phases and can deal damage of both Ranged and Magic. The Ranged attack looks like fanged projectiles, while the Magic attack looks like two small green projectiles. The Hydra will  use three of the same attacks in a row, before switching to its other attack style – exactly like Demonic Gorillas. For this reason, when you correctly predict the Attack Styles, you can pray against them to take 0 damage.

Phase 1 – When you first enter the room, the Hydra will have a green carapace, and should be lured to the red vent within the room. During this phase, you should be on the lookout for poison pools, and avoid them accordingly. Once the Hydra reaches 75% health, it will progress to phase 2.

Phase 2 – During Phase 2, the Hydra will now have a blue carapace and should be lured to the green vent within the room. During this phase, the Hydra will launch electrical projectiles which will all move towards your current location, and should be avoided. Once the Hydra reaches 50% health, it will progress to phase 3.

Phase 3 – During Phase 3, the Hydra will now have a red carapace and should be lured to the blue vent within the room. During this phase, the hydra will launch two fire walls around the prayer, and launch a separate fire attack which will track the player’s movement and should be avoided. Once the Hydra reaches 25% health, it will progress to phase 4.

Phase 4 – During Phase 4, the Hydra will now have a gray carapace and you do not need to lure it to a vent. During this phase, the Hydra will continuously change attacks, one after the other, in a similar manner to the ‘Jad’ phase a Zulrah. Simply switch protection prayers, between Protect from Magic and Protect from Missiles between each attack to nullify any damage from this phase, and finish the kill.

Hydra Video Guide

Recommended Setup

Setup Bonuses

Equipment bonuses for this recommended setup.

Attack bonus

Stab: 0 Slash: 0 Crush: 0 Magic: 0 Ranged: 0

Defence bonus

Stab: 0 Slash: 0 Crush: 0 Magic: 0 Ranged: 0

Other bonuses

Melee strength: 0 Ranged strength: 0 Magic damage: 0 Prayer: 0

Inventory

View your recomended inventory below.

Super restore(4) - OSRS item icon
Saradomin brew(4) - OSRS item icon
Antidote++(4) - OSRS item icon
Ranging potion(4) - OSRS item icon
Anglerfish - OSRS item icon
Teleport to house (tablet) - OSRS item icon

Alchemical Hydra Guide

The Alchemical Hydra is a boss version of the hydra, found in the lower level of the Karuulm Slayer Dungeon beneath Mount Karuulm, and it requires level 95 Slayer to kill. It was the creation of a Dragonkin named Karuulm, who saw promise in it but ultimately abandoned it as a failure alongside his other creations: the Wyrms, Drakes, and Hydras. With a combat level of 426 and 1,100 Hitpoints, it sits at the top of the slayer-boss ladder.

What makes the Alchemical Hydra special is that it can only be killed while on a hydra Slayer task, and those tasks are assigned only by Konar quo Maten. It carries the highest Slayer requirement of any slayer boss. The fight is a four-phase puzzle: each phase has its own colour, its own special attack, and its own chemical vent you must lure the boss over to strip its defences. Get the vents and prayers right and you will barely take a scratch; get them wrong and the Hydra hits harder. It rewards patient, mechanical play more than raw gear, which is exactly why it is one of the most farmed money-making and unique-hunting bosses in the game.

Requirements & where to fight

Before you can throw a single attack at the Alchemical Hydra, you need to meet a few hard requirements:

  • 95 Slayer to kill it at all, plus an active hydra Slayer task. Unlike normal hydras, the Alchemical Hydra can only be killed while on a hydra task, and those tasks are assigned only by Konar quo Maten. It can also be assigned as a boss slayer task, but again only by Konar.
  • Heat protection footwear unless you have finished the elite Kourend & Kebos Diary. Because the lair is inside a volcano, players without the elite diary must wear boots of stone, boots of brimstone, or granite boots to survive the extreme heat of the dungeon floor. Without them, the rapid heat damage will interrupt your actions.

The boss lives in the lower level of the Karuulm Slayer Dungeon, at the northern side. From the entrance you run north past the Tasakaal, then east past the hydras' chamber, and Orrvor quo Maten will be guarding the entrance to the lair. If you have 88 Agility, the mysterious pipe shortcut just behind Kaal-Ket-Jor lets you reach the lair safely without running the gauntlet.

The fight takes place in an instanced room. Once you jump the rock barrier and enter the test chamber, the Hydra becomes aggressive and the doors lock behind you. Your only ways out are to kill the boss, die, or teleport — you cannot even log out inside the room. If you die in the instance, you can reclaim your items from Orrvor quo Maten outside for 100,000 coins each time. Dying a second time while he still holds your items will lose them forever, so do not leave loot uncollected.

Recommended stats & gear

The Alchemical Hydra has a Defence level of 100 and is weakest to ranged attacks, carrying a global ranged resistance of only +45. That makes Ranged the recommended and most popular style for the fight. Because the Hydra's defensive stats are relatively low, the meta actually prioritises prayer bonus over raw ranged accuracy — you take so little damage when you handle the mechanics correctly that staying topped up on prayer matters more. If you are comfortable prayer flicking, you can instead lean into a max-accuracy ranged setup and dramatically cut your prayer-potion usage.

Melee is a strong alternative. Because the Hydra is considered draconic, Dragonbane weapons are effective against it — if meleeing, the standard choice is a dragon hunter lance on the stab attack style. The Hydra's stab defence is slightly higher than its ranged defence, but its low overall Defence level still gives acceptable accuracy. Melee setups often match ranged damage output, especially when paired with a good special-attack weapon, and usually have lower upkeep. The trade-off is that luring the boss over the vents without missing attacks is trickier in melee than at range. For melee, strength bonus is preferred over prayer bonus.

Magic is not recommended. Although a June 2025 update gave the Hydra a 50% elemental weakness to earth spells, its Magic Defence level of 260 still makes magic a poor choice in practice. For specific item recommendations across every slot — whether you are kitting out ranged or melee — use our Boss Gear Finder above, which builds a loadout to your stats and budget. Key families to aim for are best-in-slot ranged armour (Masori / crystal / blessed d'hide tiers) with a slayer helmet, and for melee a melee setup built around the dragon hunter lance plus a special-attack weapon.

Inventory & supplies

Your inventory for the Hydra is built around prayer sustain, a little food, and a special-attack weapon — not heavy brews, because good positioning means you barely get hit. A typical kit looks like this:

  • Prayer restoration: about 4–20 prayer potions or super restores. More prayer potions means longer trips, at the cost of not banking your hydra bones. Banking the bones lowers overall kill rates because of bank-running time, so it is generally not recommended without a fast teleport like Rada's blessing 4.
  • Food: about 4–10 pieces, ideally cooked moonlight antelope. As you get more proficient and take almost no damage per kill, you can swap excess food for more prayer potions on longer trips.
  • Combat potion: a divine ranging potion, ranging potion, or bastion potion for ranged (the bastion is largely superfluous since prayer and positioning mitigate all damage once experienced). Melee players bring a divine super combat or super combat potion.
  • Poison cure: antidote++ or sanfew serum if you are not bringing cooked moonlight antelope — the antelope cures poison when eaten, so it doubles as your antipoison.
  • Special-attack weapon: a Zaryte crossbow with ruby dragon bolts (e) is excellent during the flame phase to maximise the chance of skipping the flame-wall attack, especially when combined with a Lightbearer. For melee, a defence-reducing spec (such as Bandos godsword, whose spec applies before the Hydra's 75% damage reduction) used at the start of a kill.
  • Teleports: house tablets or rings of dueling to restore stats and bank between trips.
  • Rune pouch / runes: a divine rune pouch with runes for High Level Alchemy and Teleport to House (leave open slots for rune drops if you are picking them up).
  • Optional: a bracelet of slaughter to extend the task, and a bonecrusher or bonecrusher necklace to auto-bury hydra bones. The bonecrusher necklace can also be equipped during the death animation to restore an extra 8 prayer points per kill.

Fight mechanics: the four phases

The Hydra has four phases, each beginning when it crosses a 25% health threshold — at 825, 550, and 275 Hitpoints. A head falls off at each threshold and the boss roars and changes colour. For the first three phases it attacks with both Magic and Ranged, switching style after every three basic attacks; just before it switches, it sways its heads backwards as a tell, so watch for that and flip your overhead prayer accordingly — Protect from Magic against its magic attacks and Protect from Missiles against its ranged attacks. These basic attacks hit up to 35 outside the enrage phase, but the matching protection prayer blocks them entirely. At the start of each phase it performs three auto-attacks before its phase special.

The core defensive mechanic runs through every phase but the last: the Hydra has a 75% damage reduction until you lure it over the correct chemical vent and it gets sprayed, at which point it roars ("Roaaaaaaaaaaar!") and its defences drop. The vent is chosen by the combat triangle, so the vent colour does not match the Hydra's colour. Crucially, if you lure it over the wrong vent, its attack damage increases — though protection prayers still block all damage regardless. The mapping is:

  • Serpentine (green) → Red vent (south-east).
  • Electric (blue) → Green vent (north-east).
  • Flame (red) → Blue vent (north-west).
  • Enrage (grey) → no vent needed.

Phase 1 — Serpentine (poison). The Hydra starts with a green carapace; lure it to the red vent. After its first three attacks it launches poison blobs on and around you that form poison pools. The blobs have a 3x3 splatter dealing up to 7 damage, standing on a pool deals up to 12 poison damage per tick, and being hit by the targeted blob poisons you for 6 (otherwise 4). The clean way to dodge it is to run north on the Hydra's fourth attack. At 75% health (825 HP) the bottom-right head falls off and it turns blue.

Phase 2 — Electric (lightning). Now blue; lure it to the green vent. The Hydra launches an electric ball in the centre of the room that spawns four lightning currents in the corners, all converging on your position. Getting hit binds you and deals up to 22 damage. The easiest dodge is to run west along the northern wall as the lightning approaches; advanced players can trap the lightning in the north-west corner with a precise diagonal step. If the Hydra phases while lightning is on the field, it dissipates immediately. At 50% health (550 HP) the bottom-left head falls off and it turns red.

Phase 3 — Flame. Now red; lure it to the blue vent. The Hydra periodically walks to the centre, stuns you (you can still attack), breathes a 5x5 wall of fire to your sides, then launches a tracking fire down the middle. That fire follows your movement and speeds up the further you are or if you run, so turn run off and walk in a straight line as it trails you. Getting clipped deals up to 25 damage plus a burn of 5 damage for 5 hits. The Hydra will not attack for roughly seven ticks after launching the tracking fire. At 25% health (275 HP) the middle head falls off and it turns grey.

Phase 4 — Enrage (grey). No vent is needed here — its damage reduction no longer resets. The Hydra's attack speed increases (attacking every four ticks instead of six) and its enrage builds to maximum, letting it deal up to 55 damage per hit. It now alternates Magic and Ranged every single attack, starting with the opposite style of whatever it last used. After the first three auto-attacks it uses the phase-1 poison attack again, then repeats it after every nine subsequent attacks (sometimes only one blob instead of five). You must switch your overhead prayer with every basic attack for the rest of the fight; you can safely flip as soon as the Hydra begins its current attack animation.

Strategy & kill rotation

The whole kill is a rhythm: lure to the right vent, strip the 75% damage reduction, then DPS while dodging the phase special and flicking prayers. Here is the clean loop:

  • Set up your spawn position. After your first kill, stand right next to the red chemical vat to the east so the freshly spawned Hydra is automatically lured to the red pool — this removes wasted time at the start of every kill.
  • Phase 1 (green): get it onto the red vent, attack until it roars, then DPS. Dodge the poison by running north on its fourth attack. Keep the correct overhead prayer up against its Ranged/Magic attacks.
  • Phase 2 (blue): lure to the green vent, then handle the lightning by running west along the north wall as it converges.
  • Phase 3 (red): lure to the blue vent. This is the phase good players skip — use a damaging special attack (for example a Zaryte crossbow with ruby dragon bolts, or melee burst specs) to push the Hydra past 25% before the flame wall ever fires. Learning to skip the flame phase significantly speeds up kills and avoids the fire damage entirely. (Note: the flame/red phase is immune to normal burns, so do not save burn specs like burning claws for it.)
  • Phase 4 (grey): no vent — just flick prayers every single attack and dodge the recurring poison special. This is also where, if you are using a bracelet of slaughter to extend the task, you switch it in — conveniently while dodging the poison special, since prayer does not need to change during that attack.

With near-max gear and stats, a kill takes roughly 1:45–2:15. When the Hydra dies it respawns shortly after and the doors unlock; the wiki sources cite slightly different respawn figures (the strategy page gives about 20 seconds, the main page about 25), so expect a short pause before the next kill. Because drops stay on the ground for up to three hours (or until you leave the instance), you can comfortably stack loot across a trip before banking.

Notable drops

The Alchemical Hydra is one of the most rewarding slayer bosses, and its marquee uniques are what bring players back trip after trip. The two headline chains are:

  • Hydra's claw — combined with a Zamorakian hasta to create the dragon hunter lance, the best-in-slot stab weapon against draconic bosses (including the Hydra itself).
  • Hydra leather — used on the machinery in the Lithkren Vault to craft ferocious gloves, top-tier melee hands.

The Hydra also drops its pet, the Ikkle hydra, at a rate of 1/3000, and the collection-log jar of chemicals at 1/2000. Beyond the uniques it shares the full Konar drop table — herbs, runes, alchables, and a chance at the rare drop table — alongside its guaranteed hydra bones. The complete, exact drop table with every rate is rendered above this guide.

Common mistakes

  • Luring to the wrong vent. The vent is decided by the combat triangle, not the Hydra's colour. Spraying the wrong vent keeps the 75% damage reduction and increases the Hydra's damage. Memorise the mapping: green Hydra → red vent, blue → green, red → blue.
  • Forgetting heat-protection boots. Without the elite Kourend & Kebos Diary you must wear boots of stone, brimstone, or granite, or the dungeon's heat will interrupt your actions on the way in and during item retrieval.
  • Running from the tracking fire. The flame trail speeds up the further you are and if you run. Turn run off and walk in a straight line — or better, skip the flame phase entirely with a damaging special attack.
  • Sloppy prayer flicking in the enrage phase. The grey phase alternates Magic and Ranged every single attack and hits for up to 55. Missing a prayer flick here is where most avoidable damage and deaths happen.
  • Saving burn specials for the flame phase. The red/flame phase is immune to normal burns, so weapons like burning claws should be used at the start of the blue or grey phases instead.
  • Leaving loot uncollected after a death. Orrvor quo Maten holds your items for 100,000 coins per reclaim, but dying a second time before collecting wipes them permanently.

Notable Alchemical Hydra drops & rates

Jar of chemicals drop Jar of chemicals 1/2,000 · tertiary
Ikkle hydra drop Ikkle hydra 1/3,000 · pet

Drop rates from our drift-checked database; live Grand Exchange values are on the GE Price Tracker.

Alchemical Hydra Guide — FAQ

What Slayer level do I need to fight the Alchemical Hydra?

You need 95 Slayer, and you must be on an active hydra Slayer task. Those tasks are assigned only by Konar quo Maten — the Alchemical Hydra cannot be killed off-task. It has the highest Slayer requirement of any slayer boss. See our Slayer guide for how to reach 95 and unlock hydra tasks.

What combat style is best against the Alchemical Hydra?

Ranged is the recommended style — the Hydra is weakest to ranged attacks, with only +45 ranged resistance. Melee is a strong alternative because the Hydra is draconic, so a dragon hunter lance on stab performs very well. Magic is not recommended: despite a 50% earth-spell weakness added in 2025, its Magic Defence level of 260 still makes it a poor choice.

How do the chemical vents work?

For the first three phases the Hydra has a 75% damage reduction until you lure it over the correct vent, chosen by the combat triangle — so the vent colour does not match the boss colour. Green Hydra goes to the red vent (SE), blue goes to green (NE), and red goes to blue (NW). Luring it over the wrong vent increases its damage instead of removing its defences. The grey enrage phase needs no vent.

What is the Alchemical Hydra's max hit?

It varies by phase. The headline is the grey enrage phase, where it can hit up to 55 per attack. The lightning phase deals up to 22, the flame attack up to 25 plus a burn, and standing on a poison pool deals up to 12 per tick. Protection prayers block all of the Hydra's regular attacks, so most damage comes from mishandled specials.

What are the best unique drops from the Alchemical Hydra?

The two marquee uniques are the hydra's claw (combined with a Zamorakian hasta to make the dragon hunter lance) and hydra leather (used to craft ferocious gloves). It also drops the Ikkle hydra pet at 1/3000 and the jar of chemicals at 1/2000. The full drop table with all rates is shown above this guide.

What gear and supplies should I bring?

Bring a ranged or melee setup built for the meta style, 4–20 prayer potions or super restores, 4–10 food (cooked moonlight antelope, which also cures poison), a combat potion, and a special-attack weapon such as a Zaryte crossbow with ruby dragon bolts for skipping the flame phase. Don't forget heat-protection boots if you lack the elite Kourend & Kebos Diary. For a full slot-by-slot loadout to your stats, use the Boss Gear Finder above.

Heading

More info failed :(
Possible reasons for this: our item ID is wrong, osrsbox is down or GE Tracker is down. Report this here.
OSRS item details Members Item: Tradeable:
Price: Updated: