

Demonic Gorilla Best in Slot Gear & Strategy Guide
Best Gear vs Demonic Gorilla
auto-updated from live wiki dataYour stats
Defaults to a maxed (99s) main-game account. Edit any stat to match yours.
Best Ranged setup vs Demonic Gorilla
Suggested items
Damage / sec
—
vs Demonic Gorilla
Max hit—
Accuracy—
Time to kill—
Setup value
—
Build options — pick your budget
Open in the DPS calculator →
Best in slot gear for Demonic Gorilla (current meta)
This setup is computed live from the same wiki-sourced combat stats and monster data that power our OSRS DPS calculator — so it tracks the current meta instead of going stale. Pick your combat style above and it ranks every viable weapon and armour piece by damage per second against Demonic Gorilla, factoring in the boss's defences, size and any elemental weakness.
Not at maxed stats? Lower any level on the left and the recommendation re-ranks instantly — requirement-gated gear drops out automatically. For the full ranked list per slot, open the BiS calculator; to pit two specific items against each other, use Gear Compare.
Demonic Gorilla Strategy Guide
Demonic Gorilla Guide
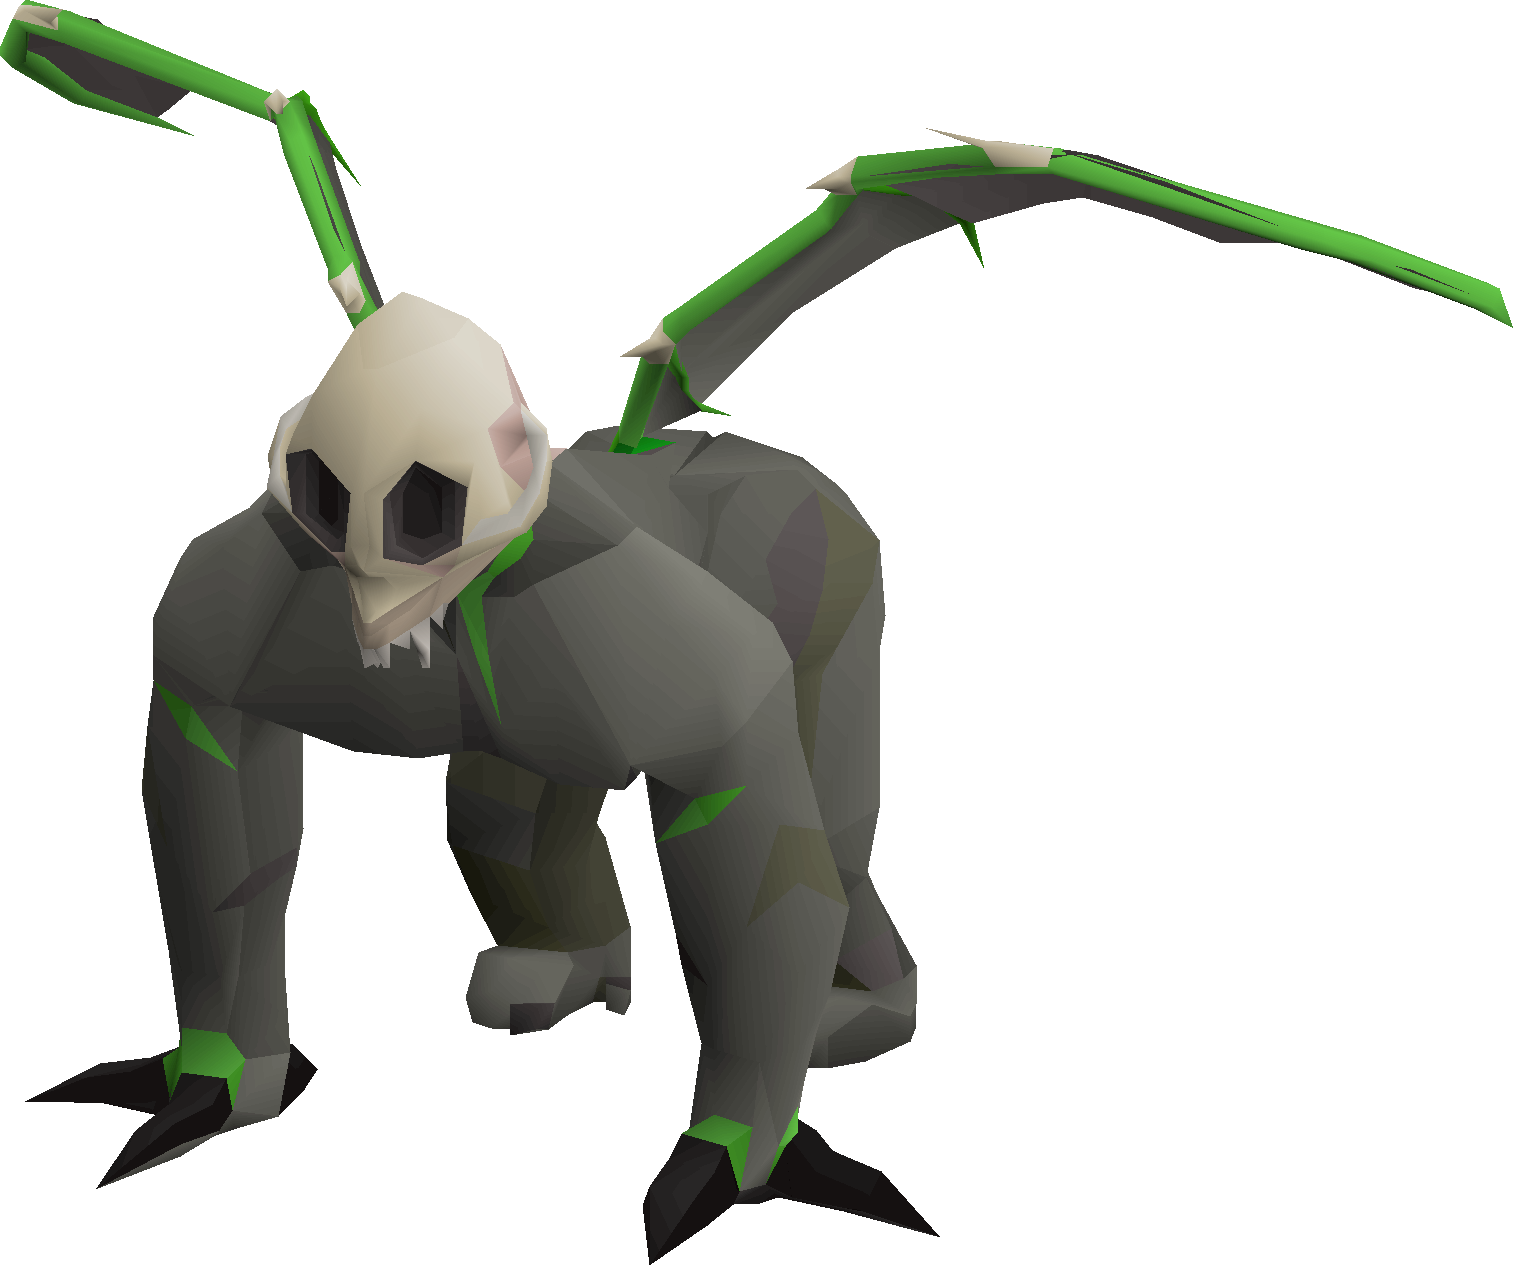
Demonic gorillas are powerful creatures found in the Crash Site Cavern, originally created by Glough as one of his demonic experiments. Two of them are fought during the Monkey Madness II quest, in the penultimate stage of the final fight; once the quest is complete, the full cavern of them opens up alongside their tortured gorilla brethren. They sit at combat level 275 with 380 Hitpoints, and they are one of the most distinctive PvM encounters in the game because they actively fight back with prayer and attack-style switching of their own.
Players hunt them almost entirely for one drop: the zenyte shard, the ingredient behind the game's best jewellery, plus the Ranged components used to build a heavy or light ballista. Because they count as both black demons and monkeys for the purposes of a Slayer task, they are also a popular and profitable assignment for anyone working through their Slayer grind.
What makes them genuinely difficult is not raw stats but reactivity. A demonic gorilla rotates between Melee, Ranged and Magic attacks, and it raises its own protection prayers against your last-used combat style. The whole fight is a duel of prayer flicking and gear switching: you swap your prayer to block its incoming attack while simultaneously swapping your weapon and gear to attack through whatever protection prayer it has up. Get the rhythm right and you can kill them almost food-free; get it wrong and the damage stacks fast.
Requirements & where to fight
Demonic gorillas live in the Crash Site Cavern, the underground area connected to the Monkey Madness II questline. The single hard requirement to fight them is completion of Monkey Madness II, which is what grants access to the cavern in the first place. There is no Slayer-level requirement to attack them, but they count as black demons or monkeys on a Slayer task, so you can also be assigned them.
Getting there: the entrance is found north-west of the Grand Tree, through the opening in the fence; once through, run north-east to enter the cavern. The wiki lists three convenient travel options:
- The royal seed pod's teleport, which drops you at the base of the Grand Tree. This is the fastest travel option and the standard choice.
- A spirit tree to the Gnome Stronghold, then run north and north-west to the gap in the fence.
- The gnome glider to Ta Quir Priw, which takes you to the top of the Grand Tree; descend and run north-west to the gap.
One important warning: some parts of the cavern are a multi-combat area. Solo players may wish to avoid those sections, because in multi you can be hit by other players' boulder attacks (more on that below). Since the April 2025 update, demonic gorillas are no longer aggressive after you have completed Monkey Madness II, so you choose when each fight begins.
Recommended stats & gear
Demonic gorillas are not strictly level-gated beyond the quest, but the wiki gives clear advised stats so you can survive the constant switching and out-damage their 70-damage prayer threshold. The recommended levels are:
- Attack 80+ and Strength 85+ for your melee output
- Defence 80+ to soak the hits you mistime
- Ranged 85+ for your second combat style
- Hitpoints 80+ as a survival buffer
- Prayer 70+ to keep the protection prayers running
- Magic 70+, purely for Magic defence against their Magic attacks
Beyond raw stats, the wiki recommends a few quest unlocks: Recipe for Disaster for Barrows gloves, Dragon Slayer II for Ava's assembler (or Animal Magnetism for the cheaper Ava's accumulator), and Shadow of the Storm for the arclight. Having an imbued slayer helmet or black mask is also recommended for the on-task damage boost.
The meta style: the standard kill uses two combat styles, almost always melee and ranged, because they are cheap and exploit the gorilla's lower Defence. Magic is technically possible since they have a 35% water-spell weakness, but it is generally a worse option given the higher rune cost and their higher Magic defence roll. On the melee side, demonbane weapons shine: the arclight (early access) and the upgraded emberlight both deal increased damage against demon-type monsters, and an imbued berserker ring adds +3 to your max hit when paired with either. On ranged, the toxic blowpipe, scorching bow and twisted bow all perform well with minimal switches.
Rather than copy a fixed list, dial in your exact loadout for your bank and stats with our Boss Gear Finder above — it covers best-in-slot, more-affordable and budget tiers for both styles and accounts for your Slayer-helm and demonbane access. You can also browse the broader melee gear and ranged gear pages to plan upgrades.
Inventory & supplies
Because the whole fight revolves around switching, the golden rule is do not bring too many gear switches. With high-end weapons your damage output is already very high, so the wiki recommends keeping switches to a small set — primarily a body, weapon and amulet swap for your second style. Gloves, boots and rings are not recommended as switches, because the gorilla's low prayer-swap thresholds make those extra clicks hard to land optimally. Set up F-key keybinds for your prayer and inventory tabs so you can flick between interfaces fast.
A typical supply kit, drawn from the wiki's setups, includes:
- Item switches for your Ranged attack style (the body/weapon/amulet for your second style).
- Divine combat and Divine ranging potions for stat boosting (Super combat and Ranging potions on a budget).
- Super restore potions to keep your prayer points topped up — this is the supply you burn fastest.
- Saradomin brew for overhealing your Hitpoints before re-drinking a divine potion, plus food such as sharks or anglerfish.
- Saradomin godsword as your special-attack weapon — its healing special restores enough Hitpoints that experienced, high-level players often need little or no food.
- Royal seed pod for the quickest teleport back.
- A rune pouch (or divine rune pouch) carrying High Level Alchemy runes, which also lets you store the law and death rune drops; and an ash sanctifier to auto-scatter the malicious ashes.
If you are staying for a long trip, the wiki notes that a set of Guthan's equipment can be swapped in to restore health when you take too much damage, and that Demonic Offering can restore extra prayer points while granting more Prayer experience than an ash sanctifier.
Fight mechanics
Demonic gorillas have several intertwined mechanics. Understanding each one in isolation is what turns a chaotic fight into a predictable rhythm.
Three attack styles. They use all three combat styles — Melee, Ranged and Magic — each hitting up to 30 damage (the infobox lists a max hit of 31, rising to 40 on the special attack). The Melee attack is a claw swipe; the Ranged attack grabs and throws a small boulder; the Magic attack rears up and emits a green orb. Their attack speed is 5.
Attack-style switching. A gorilla starts on a random style and will switch to a new one after three missed hits against you — meaning three attacks that deal zero damage, whether your protection prayer blocked them or you simply weren't hit. When it switches, it screams "Rhaaaaaaa!" overhead with a matching bone-chilling audio cue, so you get a clear warning. Counting missed hits lets you predict the next switch. Crucially, the boulder toss does not count toward these three missed hits.
Their protection prayers. Each gorilla rotates between Protect from Melee, Protect from Magic and Protect from Missiles, with only one active at a time. The active prayer gives complete immunity to that style. It cannot be bypassed by a dragon scimitar and cannot be bypassed by special attacks — but it can be bypassed with Verac the Defiled's equipment, whose set effect ignores prayer. A gorilla keeps its prayer until it takes 70 or more total damage in the style(s) it is not protecting against, then it switches. That 70 is cumulative across styles: hit it for 49 melee then 26 ranged and it will immediately swap to Protect from Missiles. When it changes prayer, your combat ends, so you must swap gear and re-click it to resume.
The boulder (special) attack. While using Ranged or Magic, the gorilla will sometimes beat its chest and drop a boulder onto the tile you are standing on when it starts the attack. It has a 1x1 area of effect and casts a visible shadow where it will land. If you don't move at least one tile away, you take 33% of your current Hitpoints as damage — but because it scales off current health, a single boulder can never kill you outright. The gorilla will not use this attack while meleeing. In a multi-combat area, remember you can also be struck by other players' boulders, so spread out.
Strategy & kill rotation
The fight is a loop: block its incoming attack with the right protection prayer while attacking through its protection prayer with the opposite style. Here is how the pieces fit together.
Prayer-swap priority. The wiki recommends prioritising Protect from Magic first, then Protect from Missiles and/or Protect from Melee. Watch the gorilla's attacks closely, count missed hits, and listen for the "Rhaaaaaaa!" scream that signals a style change.
Predicting the next style (works ~83% of the time). When the gorilla switches, you can often guess what's coming by watching its feet:
- If it just used Melee, it switches to Magic or Ranged — unpredictable, so pray your lower defensive style to limit damage if you guess wrong.
- If it just used Magic, step away: if it follows you, Melee is next; if it stays put, Ranged is next.
- If it just used Ranged, step away: if it follows you, Melee is next; if it stays put, Magic is next.
- If it opens a new pattern with a boulder, it will follow up with Ranged or Magic, so pray accordingly.
The core rotation from the wiki's worked example goes like this. You engage with melee gear and Protect from Magic up. The gorilla opens with, say, Magic; you take three zero-damage hits, it screams and switches to Ranged. Meanwhile your melee has dealt 70+ damage, forcing the gorilla onto Protect from Melee — so the instant you hear the switch, you flick to Protect from Missiles and swap to your Ranged gear (to attack through its melee prayer). You keep dealing ranged damage from one tile away, dodging boulders, until you push another 70+ damage and it flips to Protect from Missiles, at which point you swap back to melee gear and Protect from Magic. The cycle repeats for the whole kill.
Special-attack timing. The Saradomin godsword's special heals you, which (with a lightbearer) can make the trip nearly food-free; the toxic blowpipe special can also heal if you lack a Saradomin godsword. Be careful with multi-hit melee specials like dragon claws, burning claws or dragon dagger: if the gorilla swaps prayer mid-special, the later hitsplats get nulled. Use them immediately after the gorilla switches away from Protect from Melee to get full value. Note also that any Burn damage (from burning claws or the scorching bow) is cleared the moment the gorilla changes prayers.
Team option. In the multi-combat section, a duo can run a Dharok's setup: one player tanks all the gorilla's attacks while a partner in full Dharok's at 1 Hitpoint deals enormous melee damage. The tank brings Lunar Boost Potion Share and ideally Guthan's to heal indefinitely, and both players keep accept-aid on. Time your attacks together so you don't hit the gorilla on the same tick it swaps prayer.
Notable drops
The headline drop is the zenyte shard, at a rate of 1/300. Zenyte shards are cut into zenytes and used to craft the game's best jewellery — the reason demonic gorillas are farmed at all. The full rate table is drawn directly from our verified drop database above; here we just flag the marquee uniques.
The other uniques are the ballista components, used to build heavy and light ballistae: ballista limbs (1/500), ballista spring (1/500), light frame (1/750) and heavy frame (1/1500). These uniques are reached through a shared unique sub-table roll on death.
Every demonic gorilla also drops malicious ashes as a guaranteed 100% drop, which is why an ash sanctifier or Demonic Offering is worth bringing. Beyond that the standard table mixes rune armour, law and death runes, herbs, seeds and supplies — check the full table above for exact items and rates, and use our GE price tracker to see what your loot is currently worth.
Common mistakes
- Not re-clicking after a prayer swap. When the gorilla changes protection prayers, your combat ends. If you don't immediately swap gear and re-click it, you stop dealing damage and the fight drags — change gear and re-engage the instant it swaps.
- Counting the boulder as a missed hit. The boulder toss does not count toward the three missed hits that trigger a style switch. If you include it in your count, your prediction of the next switch will be off.
- Standing still during a boulder. The boulder lands on your current tile and deals 33% of your current Hitpoints. Always step one tile away when the gorilla is on Ranged or Magic and you see the shadow.
- Bringing too many switches. Gloves, boots and ring swaps are not worth it — the low prayer-swap thresholds make them hard to land. Keep to a body, weapon and amulet switch.
- Expecting specials to bypass prayer. Special attacks do not bypass the gorilla's protection prayer; only Verac's set effect does. Don't waste a special into an active protection prayer.
- Trying to use a cannon. Demonic gorillas cannot be damaged by a Dwarf multicannon, so leave it at home.
- Mistiming multi-hit claws. Dragon or burning claws can lose damage if the gorilla swaps prayer mid-special; fire them right after it leaves Protect from Melee.
Notable Demonic gorilla drops & rates
Drop rates from our drift-checked database; live Grand Exchange values are on the GE Price Tracker.
Demonic gorilla Guide — FAQ
What do I need to fight demonic gorillas?
You must have completed Monkey Madness II, which unlocks the Crash Site Cavern where they live. There is no Slayer-level requirement to attack them, although they can be assigned as a black-demon or monkey Slayer task. The wiki advises high combat stats — roughly Attack 80, Strength 85, Defence 80, Ranged 85, Hitpoints 80, Prayer 70 and Magic 70 — to handle the constant switching comfortably.
What is the zenyte shard drop rate?
The zenyte shard drops at 1/300. It is the main reason players farm demonic gorillas, since zenyte shards are cut into zenytes used for the game's best jewellery. The gorillas also drop the ballista components — ballista limbs and spring at 1/500, light frame at 1/750 and heavy frame at 1/1500.
How do I deal with their protection prayers?
Each gorilla keeps one protection prayer up at a time and you can't get through it with a normal weapon, a dragon scimitar or even a special attack — only Verac's set ignores it. It holds the prayer until it takes 70 or more total damage in styles it isn't protecting against, then switches. The standard answer is to carry two styles, usually melee and ranged, and swap your weapon and gear to whichever style the gorilla is not currently praying against.
How does the boulder attack work?
While the gorilla is using Ranged or Magic, it sometimes drops a boulder onto the tile you're standing on, marked by a shadow. It hits for 33% of your current Hitpoints over a 1x1 area, so simply step one tile away to avoid it. Because it scales off current health, one boulder can never kill you outright, and it never happens while the gorilla is meleeing. In multi-combat areas you can also be hit by other players' boulders.
Can I use a cannon or magic on demonic gorillas?
You cannot use a Dwarf multicannon — they take no cannon damage. Magic is possible, since they have a 35% weakness to water spells, but it's generally a worse choice than melee and ranged because of higher rune costs and their high Magic defence roll. As demons, they are vulnerable to demonbane weapons like the arclight and emberlight, which is why melee is the preferred main style.
Do I need a Slayer task to kill them?
No — you can kill demonic gorillas off-task. However, they count as both black demons and monkeys for Slayer, so they can be assigned, and bringing an imbued slayer helmet (or black mask) on-task gives a worthwhile damage and accuracy boost. If you want to plan a Slayer route, see our Slayer guide.
Heading
Possible reasons for this: our item ID is wrong, osrsbox is down or GE Tracker is down. Report this here.

